> Hi there!

// building AI-native identity, security, and cryptography
Alex Grinman

I'm building Footprint, an AI-native platform for portable identity and risk operations that automates verification, fraud detection, and financial crime investigations.

Before Footprint, I co-founded KryptCo (acquired by Akamai). We built Krypton Authenticator (now Akamai MFA) to make strong authentication easy and beautiful. I worked across the stack: cryptographic protocol design, product, UX, and iOS engineering.

I spent 5.5 years at MIT, finishing my undergrad in 2015 and my masters in 2016, both in computer science with a focus on cryptography. I wrote my thesis on Natural Language Processing on Encrypted Patient Data with Shafi Goldwasser.

I've been building iOS apps for over a decade, starting with iOS 3 in high school. Early on, my dad and I built real-time transit apps for Boston commuters, including the Greenline app.

> Posts & Articles

// A collection of posts, articles, and other miscellaneous coms.
cd ../postsDec 31st, 2021

Building a Decentralized Identity Verification system on Solana (Part 1)

SMS is more than 35 years old and while it was mainly designed for communication, in practice we also use our mobile phone numbers as universal identifiers. We use them to login to apps like Uber and Venmo and for two-step verifications at banks and social media sites.

However, phone-numbers-as-identity has several big problems:

  • SIM swap attacks are very real
  • SMS messages are not encrypted
  • It's expensive to get new phone numbers
  • Verifications are relatively expensive: Twilio charges .75 pennies per message
  • You don't really “own” your phone number, it belongs to the telco
  • Phone numbers are not “friendly” identifiers

These problems boil down into several categories: security, ownership, and cost.

A different approach: Smart Contracts and Decentralized Identifiers

In this post series we'll present one way to build a new decentralized identity and verification system that improves on phone numbers. We're building it on the Solana blockchain solely with Smart Contracts (a.k.a Solana Programs).

Why a blockchain?

It's important to note that it is possible to build a similar system that is not on-chain — a centralized, trusted third-party service. We specifically stay away from this approach because we want the system to be provably correct and secure, and function transparently. Without a trusted third party, decentralized consensus is one approach to achieve this.

Why Solana?

  1. Transaction costs are negligible
  2. The account programming model is powerful
  3. Programs can be written in Rust (or any programming language that can target the LLVM BPF backend)
  4. The developer experience is first class (in part, thanks to frameworks like Anchor)

Overview

The idea is to replace phone numbers with friendly user identifiers, i.e. a username. Any person should be able to claim a username as their own (first come, first serve). Any service, i.e. AcmeInc, should be able to challenge any user to verify their identity. The verification flow needs to be as simple as it is for SMS:

  1. type in a username
  2. receive an auth challenge
  3. verify identity by responding to the challenge

To build this on chain, our smart contract needs to have several “instructions”:

  • claimUsername
  • challengeUser
  • verifyChallenge

In this post series we'll cover some of the fundamentals of building in the Solana programming model and design, build and deploy a functioning program on chain that does decentralized identity verification as an attempt to offer an alternative to phone-number-as-identity.

We'll be writing our smart contract in Rust using the Anchor Framework. Anchor provides excellent interfaces for safety and dramatically cuts down on boilerplate code.

Solana's Programming Account Model

Accounts are how Solana programs store state on chain. Accounts are addressed by 256-bit numbers that may or may not be Ed25519 public keys. In addition to arbitrary amounts of data, Accounts also store several other important metadata attributes.

  • Balance: the number of lamports in the account (1 Lamport = 0.000000001 SOL)
  • Owner: an address of a program that owns this account, like the “SystemProgram”
  • Executable: a boolean flag that indicates if the data in the account corresponds to a program or not

Accounts that are executable are programs. The address of a program account is often called the program id.

Transaction & Instructions

The programming model has several rules that are enforced. The most important rule for the context of this post is: “Only the owner may change account data.” This means that our smart contract is the arbiter of writing data to any account it owns.

A transaction contains one or more instructions to execute a program. Instructions specify the program to execute, data arguments for the program, and a list of accounts to read and potentially mutate. Transactions can optionally be signed by one or more private keys where the corresponding public keys must be the addresses of an account in the transaction.

Claiming Usernames

Claim a username

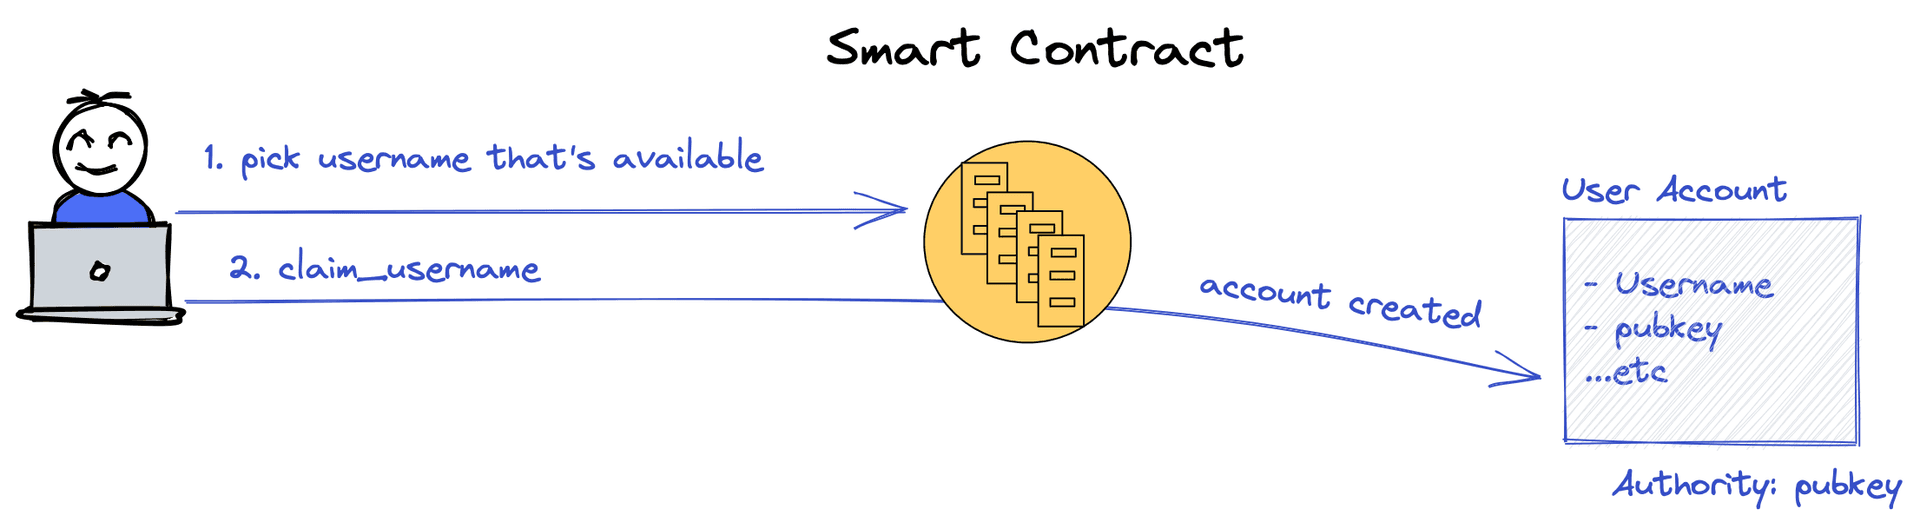
The first instruction we need to support is claiming a username. To explain how we can do this on Solana we need to first explain what a Program Derived Address (PDA) is.

The User Address

When a username is claimed we want to create a unique Account whose owner is our smart contract program and the “authority” (or who the username is assigned to) is the public key of the first person to claim the username. We call this the User account. The User Account stores the binding between the username and the authority public key.

The core requirement this system must observe is that: usernames must be unique. Two user accounts with the same username cannot exist.

To accomplish this we can use a PDA. Namely, we derive a unique address for each username. The first user to submit a transaction that creates an account with this address is the authority for that username.

Program Derived Addresses

This address is not a real public key, it's just an address namespaced to our program address space. PDAs are useful for cross-program invocation because only the program can act as a signer on behalf of this account.

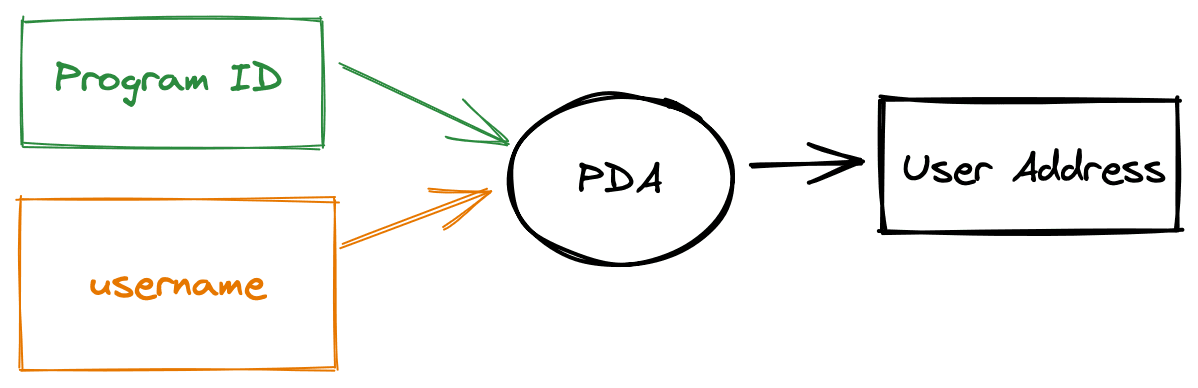
The PDA generation algorithm uses a cryptographic hash function to combine one or more “seeds” — in our case just the username — with the program id. Anybody can compute PDAs on behalf of any program.

Program Derived Addresses with bump

The generation algorithm specifically creates an address off of the Ed25519 curve to ensure that a corresponding private key cannot exist. The PDA algorithm returns a 256-bit number that “bumps” the hash off of the curve.

The User Account

Abstracting the user account with a PDA is useful for us because it gives us a convenient way to ensure that only a single account exists per username. More conveniently, it gives us a trivial way to derive the user account address with only the username. Given somebody's username, I can compute their “user address” and therefore look up the user account on chain to get the user's real public key (the “authority”).

The important data we'd like to store is the authority as it binds the username to user owned public key. However, we also store the username and bump number. We do this for convenience, as we'll later see.

Claim Username Instruction

Now let's build the claim_username program instruction. The Anchor framework really starts to shine here as it abstracts away all the safety and account architecture into simple to use Rust procedural macros.

Note that most of the work is done by the time the code in the function gets executed. This is because Anchor's procedural macro is really generating lines of code to do account creation and initialization and all sorts of safety checks like account ownership and signature verification.

Up next

That's it for part 1! We've built the foundational smart contract to claim usernames and bind usernames to self-sovereign public keys. In part 2, we'll build “Service” accounts and show how they can be used to create an SMS-style challenge-response verification scheme on-chain using usernames instead of phone numbers.

share:
cd ../postsMay 6th, 2021

No State, Just Gossip! Making tunnelto.dev distributed

Often the best way to debug a problem in a web app, is to deploy the change and test it live. Deploying is slow and sometimes not possible, but why not just test against your server running on localhost? Tunnelto.dev is a simple developer utility that lets you expose your local web server to the internet with a public URL. Use it to test and build your Webhook integration for Slack or Stripe, or use the public URL on an iPhone app so it works in demos on any network.

tunnelto.dev overview

Tunnelto.dev is certainly not the first of its kind, it's an alternative to tools like ngrok. However, unlike the others, both the tunnelto.dev CLI and server are 100% open source on GitHub so there's no vendor lock-in. (Also it's built in Rust.) It's perfect for use in the enterprise when you can't breach the corporate network. If you don't want to host it yourself, then you can use our hosted version.

Tunnelto started off as an open source Rust project — just code. But then I met Fly and I fell in love. Fly.io is a platform-as-a-service for deploying code, literally any kind of code, and it gets dynamically replicated all over the world. Basically you can quickly spin up Docker containers in any number of regions either purposefully or based on live user demand. They make it insanely easy to create production grade services with a couple of lines in a TOML file.

I had never intended to even run a hosted version of tunnelto.dev — but Fly made it so easy that I just couldn't resist.

Digging a tunnel

Running tunnelto --subdomain myapp --port 8000 opens a persistent connection to our servers running on https://fly.io using WebSockets. The tunnelto CLI proxies HTTP traffic to a locally running server on port 8000. When you go to https://myapp.tunnelto.dev you'll see your locally running server on the public web!

tunnelto tunnel diagram

When anyone fires off a request to myapp.tunnelto.dev, the tunnelto server peeks at the host and identifies the corresponding tunnelto CLI WebSocket connection that wants to serve the myapp subdomain.

Next, the entire HTTP stream is wrapped inside of the WebSocket connection, and sent down to the tunnelto CLI. The tunnelto CLI forwards that wrapped HTTP stream to http://localhost:8000.

Similarly, when your localhost server responds — the tunnelto CLI wraps the stream inside of the WebSocket connection back up to the tunnelto server. Finally, the tunnelto server returns this HTTP stream as the response to the original request.

In essence, there are two levels of proxy servers: the first leg happens at the tunnelto server which proxies HTTP streams over WebSockets (effectively HTTP over HTTP) and the second proxy happens on your local machine between the tunnelto CLI and http://localhost:8000.

Anywhat?

So what happens when we turn on fly autoscale and let Fly magically spin up many instances of our tunnelto server in many different geographies based on demand?

Fly gives our tunnelto server a fixed IP address from an Anycast block which enables the “magical internet routing engine” (BGP) to pick a route to a particular instance of our running tunnelto server with the shortest path.

Anycast routing

Who has that Tunnel?

Say you connect to myapp.tunnelto.dev and Fly routes to instance-3 in Dallas but the WebSocket connection for the myapp client is actually running on instance-7 in Boston. How do these neighbors find out about each other?

Idea: Global State

Each instance needs to know where a target tunneling client is connected to — what tunnelto server instance is persisting the WebSocket connection. So let's do something boring: add a database. Well, this is a distributed system, so let's use a distributed KV (Key-Value) Store (like Redis).

Our key value store can be simple: map subdomain -> IP. When an instance gets a request on a particular subdomain, it looks up the IP address in our KV store, and then forward proxies the connection to that instance IP.

Global state approach

Distributed databases, like CockroachDB or Redis, use gossip protocols to keep nodes in sync. By adding Redis we're adding a whole new system — a distributed system — that needs to stay in sync or else we'll get stale answers and forward the request to the wrong place.

But we don't need to rely on an external system to do this. With Fly, this connectivity is built securely into the platform.

Gossip with your neighbors

Let's cut out the middle man and just gossip! Instead of deploying another system to keep our data in sync, we can dynamically get the answers we need by going to the actual source of truth.

Gossip approach

Fly's Private Networking to the rescue!

A couple of months ago fly.io released a slick new feature called 6PN (IPv6 Private Networking). In short, each instance of your server has access to every other instance via a WireGuard mesh network.

Basically, you get secure communication and discoverability for free!

Fly.io private networking

Ask and you shall receive

Instead of a global state, we can simply gossip. An instance sends a query to each other instance asking if it hosts the subdomain in question.

  1. Accept an arbitrary HTTP connection on any subdomain, like myapp.tunnelto.dev
  2. Query the 6PN DNS server for a list of instance IPs
  3. Send, in parallel, to each instance a simple HTTP request containing the subdomain and select the host that answers “yes” (thank you tokio.rs!)
  4. Proxy the HTTP traffic to the selected instance
  5. The selected instance proxies this HTTP traffic through the WebSocket connection onto the client
Gossip protocol flow

It took about 150 lines of code in Rust all in to make tunnelto.dev distributed! In fact the first version of tunnelto was not distributed, it was designed only to run on a single VM. I never anticipated I would make fully distributed — until Fly.io forced my hand by making it so damn easy.

Advanced Gossiping

Tunnelto's use of “gossip” is rather simple. It uses a one-way broadcast mechanism and simple “yes” or “no” responses to get the data each instance needs. For more “fun” gossip techniques, take a look at SWIM (Scalable Weakly-consistent Infection-style Process Group Membership Protocol). There's even a Rust library for it!


Thanks to Thomas Ptacek and Kurt Mackey for reading drafts of this.

Check out fly.io — you should be able to deploy an app on the platform in just a couple of minutes!

Want to try tunnelto.dev? Use code FLYROCKS to get one month free.

share:
cd ../postsMarch 29, 2021

Krypton is now Akamai MFA

Akamai MFA

I founded Krypton with the idea that strong, cryptographic authentication should be easy for everyone to use. In September 2019, Akamai acquired the Krypton technology. Since then we've been busy building something new: a product that stands on the giant shoulders of the Akamai Intelligent Edge Platform to take Krypton to a whole new level.

I'm excited to announce Akamai MFA. It's the future of the Krypton technology and the beginning of an innovative new authentication service that delivers phish-proof push-based multi-factor authentication, a delightful user-experience, and strong cryptography to companies across the world.

Akamai MFA is not just an authenticator, it's a service that runs on the Akamai Intelligent Edge Platform to help you verify the identity of your users in a fast, secure, and frictionless way. Akamai MFA makes it easy to deploy the most cutting-edge authentication protection in front of any website or application and in the form factor that makes sense to you and your users.

By leveraging Krypton's cutting-edge authenticator technology and the power and breadth of Akamai's platform, we can finally make strong, cryptographic authentication accessible to the masses.

FAQ

Will Akamai MFA's “unphishable” push authentication work with third-party websites like Twitter and Dropbox?

Yes! Akamai MFA will not only protect your corporate accounts, but also many of your personal accounts with the same great push-based (unphishable) authentication. This is the first push-based authenticator (besides Krypton) to offer a roaming FIDO2 cross-platform authenticator in the form factor you know and love: your smartphone. Note: Compatibility with third-party sites may vary.

What are the important links for more information?

share:
cd ../postsJune 23rd, 2018

Losing 100 pounds in 276 days

On August 2nd, 2017, per the suggestion of my doctor, I decided to pickup a free download of MyFitnessPal and a $20 digital scale. I had never used the first and barely ever used the second.

When I received my scale, I weighed in at 276.8 lbs.

I had been overweight for most of my life, but this was a new extreme even for me. 276 days later, I weighed in at 176.6 lbs. Today, 326 days later, I weighed in at 163.2 lbs — a whopping 113 lbs lost.

This is how I did it, along with the data I collected along the way (calories, steps, fitness).

Caloric Deficit == Weight Loss

The only thing you really need to know is that you should be eating fewer calories than your body burns everyday. If you do this, you will lose weight — it's science. Nothing else matters for weight loss. The magnitude of the caloric difference will regulate how quickly or slowly you lose the weight.

On average, it takes about 3,500 calories to burn 1 pound of fat. Suppose you eat 1,000 fewer calories than your Basal Metabolic Rate (BMR). After a week your body will burn 7,000 calories or 2 lbs of fat.

I never understood how simple it was before starting this. I found this article to be quite helpful for learning the basics.

The single most important tool for my weight loss was the MyFitnessPal app

  1. The greatest feature of the app is that it tells you how many calories to eat. You put in your height, weight, and goal weight and it outputs your daily calorie intake limit. You can also specify how fast you want to lose the weight — I chose the max option of -2 lbs/week.
  2. The second greatest feature is the food database. MyFitnessPal has fairly accurate calorie estimates for almost anything you'd ever eat. I recorded what I ate, every single meal and snack, every single day, and even now I still do it. I'll probably do it for many years to come. It's amazingly helpful to stay on track.

The TV-ad photo

BeforeAfter

Left: ~275 lbs.
Right: ~155 lbs.

Tips

Data is king

Record everything you eat, even if you go over your limit. The accountability is helpful and it becomes addictive. MyFitnessPal reminds you a few times a day to record things so you won't forget.

Fewer calories over Time

As you lose weight (depending on how much you want to lose) your calorie goal should decrease. MyFitnessPal has a huge bug — it doesn't do this automatically, you have to periodically “adjust” your goal weight so it recomputes the daily caloric intake goal.

Exercise or don't

You don't have to exercise. If you like to exercise that's great — you'll burn more calories which means you will lose the weight faster (as long as you don't eat those calories back). I tried running — about 30m, every morning, for 3 months. At times it felt great, but in the end I didn't like it enough to stick with it. If you're just trying to cut weight, you can do that with calorie restriction alone.

“Diet plans” are not necessary

All the diet plans that I've seen really do one thing — they employ fancy tricks to get you to eat fewer calories without actually counting. Skip the gimmicks and just count calories. It's easier to deal with just one restriction.

Healthy food only?

I naturally started eating healthy foods because I could eat more of them. If you eat a chocolate bar, you will still be hungry. For the same amount of calories, you could eat a few bowls of vegetables and be full. That said, the best part about this overall approach is that you can still eat whatever you want — just count the calories.

Intermittent fasting

Somewhere along the journey I picked up intermittent fasting. I like it but it's also not necessary. I found that it helped reduce my appetite which means I can eat fewer calories. The principal is that you have a feeding period of 8 hours and a fasting period of 16 hours. I eat from 12pm to 8pm, and fast from 8pm - 12pm. This means I always skip breakfast.

Everything I wrote above is what worked for me — that is not to say it will work for everyone. I am also not a doctor, I'm an engineer, so none of this is medical advice — please consult your doctor.

share: